Introduction
In the previous turorial i have discussed how to setup the serverless api for our react app,in this tutorial i am going to discuss how to build the frontend of our react app.If you missed the first part of this tutorial series you may look here
Getting Started
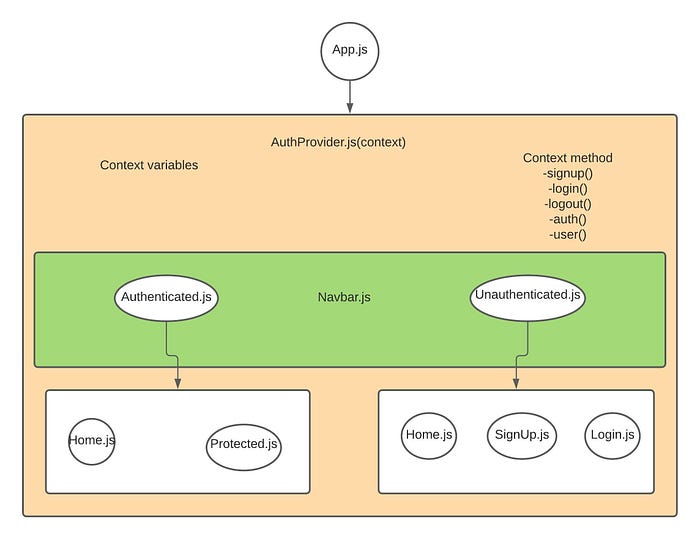
Before we began I should give you a quick vizualization of the layout upon which we are going to build our app.

There maybe tons of pros and cons of using the above layout and it is possible not to use any context api and use React router module to do the user authorization(which is describe here).
Initializing the file and folder structure
Create the following file and folder inside the src/components folder
- /pages folder
* Home.js
* Login.js
* Signup.js
* Protected.js
* Unauthorized.js - Authenticated.js file
- Unauthenticated.js file
- Navbar.js file
Create a file called auth-provider.js inside the src/provider folder
Inside the /src folder your files and folder structure should look like this
.
|-- App.css
|-- App.js
|-- App.test.js
|-- components
|   |-- Authenticated.js     <---newly created file
|   |-- Navbar.js            <---newly created file
|   |-- Unauthenticated.js   <---newly created file
|   |-- pages                <---newly created folder
|   |   |-- Home.js          <---newly created file
|   |   |-- Login.js         <---newly created file
|   |   |-- Protected.js     <---newly created file
|   |   |-- SignUp.js        <---newly created file
|   |   `-- Unauthorized.js  <---newly created file
|-- helpers
|-- index.css
|-- index.js
|-- lambda
|-- logo.svg
|-- providers
|   |-- auth-provider.js     <---newly created file
|-- reportWebVitals.js
`-- setupTests.js
Lets Code
Because this tutorial is about the frontend build i am going to skip the how i style the component and end to end details of the app,i am only going to focus on the technical part of the app i.e how and when the api’s are consumed.
Inside the provider/auth-provider.js file paste the following code
Explanation: The code above will be very easy for you if you understand react hook and context.As you could see inside the AuthProvider we save the user info in the localstorage (using the saveUser callback function) when the user gets logged in or signin and delete the user info(using the deleteUser callback function) from the localstorage when the user gets log out.isvalidToken is another callback function we used when we execute the auth method,it set the user token status as true or false (this status value come from api request).We then created four helper function(signup,login,logout and auth) which called the same sendRequest function with 3 different parameter.
Our sendRequest function accept 3 parameter,they are
- endpoint: suffix of the api url
- body : json payload which will be send to the server
- a callback function : upon successful api request it will call this function to either save the user info or to return user validity to access restricted page.
Inside the sendRequest function we have declared the request method (ie:post method) then there is the body of the request and a fetch call to our api and finally the callback function which will be triggered if the api response is ok(ie: response status code is 200)
it doesn’t matter what type of request method we are using because in our serverless api we have never explicitly mentioned the method type.
Now inside the components/pages/signup.js file paste the following code
Explanation: Here the code is pretty much self explanatory so i am going to skip the detail of how i setup and validate the form in this component but if you have any problem understanding this you may visit the react offical doc.After successfull validation we are calling the signup function which we have declared in AuthProvider.
You can see there is a conditional rendering happening inside the return statement this is because the Signup component will redirect you to Home component after you have successfully signed up.
Now inside the components/pages/Login.js file paste the following code
Explanation: Here the code is same as the above one,the only difference is we are calling the login function that we have declared in AuthProvider.
Now inside the components/pages/Protected.js paste the following code
Explanation: Here we are protecting the page/component by calling the auth function inside the useEffect hook.As mentioned above in the auth-provider.js the auth function has a callback which set the token value.Based on the token value we redirect the user to current page or the unauthorized page.
Project Repository: https://github.com/mirsahib/React-Serverless-Authentication
Special Thanks
This tutorial series is heavily influence from Mathias Søholm article on Serverless Authentication in dev.to.You can visit his dev account from here or you can read his article from here.
Conclusion
In the last part of this tutorial series we connect and build a react frontend for our serverless api.I hope this tutorial make it easier for you to understand serverless architecture and user authentication.
